How To Use Limiters / Limiting Explained
How To Use Limiters / Limiting Explained
Everybody seems to want to use Limiters, but only a handful of people go about it the right way. If you don’t know what you’re doing, using a limiter will likely do more harm than good. Want to know what limiting is, in which it differs from compression and how you should use it? Interested to find out what Gandalf the Grey and Limiters have in common? Find out in How To Use Limiters / Limiting Explained.
What Is Limiting And What Does It Do?
The word itself is a dead giveaway. With limiting, you’re – there it is – limiting the dynamic range of an audio signal. With dynamic range, we mean the difference in volume within a mix over a certain amount of time. It’s exactly like Compression, but without any trace of subtlety.
Traditionally speaking, a limiter is used as a safeguard against clipping, simply because it cuts everything below the set threshold. The below chart – courtesy of Practical Music Production – explains it quite well.
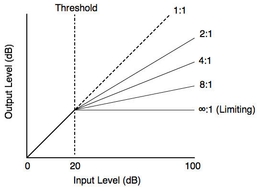
As you can see, it’s quite simple. If a threshold of 20 dB is set for the limiter, not even the tiniest of peaks will go past that level. This makes it the perfect tool to use when you don’t want your volume levels to go into the “red”.
What Is The Difference Between Limiting And Compression?
The above chart also shows us the difference between Limiting and Compression. The simplest answer to that question would be saying that they’re essentially the same, but there is one difference. And that difference lies in the ratio.
Both Limiters and Compressors are tools that reduce the dynamic range of an audio signal. Given the right setting, a compressor could even act as a limiter. Since limiting is meant to act as a shield against all peaks, it makes use of an infinite ratio. As explained in our article about Compression, the ratio setting determines how ‘hard’ you’re squashing the parts of a sound that exceed threshold level. A ratio of 8:1 would mean that a signal of 8 dB over threshold level would be compressed until there’s only 1 dB left that exceeds that level. Alternatively, a ratio of 20:1 would mean that a signal of 20 dB over threshold would be reduced to 1 dB over threshold, which boils down to a whopping 19 dB of gain reduction. Note that compressing audio with a ratio of 10:1 or higher is generally considered limiting.
In the case of a Limiter’s infinite ratio, this would mean that the sound will be compressed so hard that not even a single peak is allowed to go past the set threshold, no matter how small or short those peaks may be. There’s no room for mercy. Think of Gandalf fending of the Balrog in The Lord Of The Rings. “You Shall Not Pass”. Gandalf is the limiter, the Balrog is your audio signal. Till here and no further.

When Do You Use Limiting?
When it comes to Limiters, most (up-and-coming) producers have only one reason for using one. They’ll tell you they want to use limiting – or have already done so – to make their mix louder. Now, with the loudness war in full effect and all, we get why. And it’s not even wrong to think so. But the danger lies in pushing your limiter too far.
Limiters In Mixing
Many people seem to believe that Limiters can only be used as a mastering tool, but this isn’t true. As a creative tool, a limiter can boost the perceived volume of a certain sound. It can also be used to restrain unpredictable effects or automated sounds that have too much dynamic range. You’d simply be using the Limiter as a heavy-duty Compressor (a Compressor with a very high ratio). If pushed even harder, it can even bring (groups of) sounds to the forefront of your mix, as long as you’re not using it on too many other sounds as well.
Limiters In Mastering
In mastering, the use of a Limiter is more straightforward. It’s all about increasing the perceived volume of the entire record. When your mix is well balanced, the only things that need cutting are the transients of sounds: small sound bites that aren’t even a fraction of a second long. If you set the threshold just right, the limiter will cut those peaks without any audible side effects, which is called Transparent Limiting. Of course, you’re free to push the limiter just a little further if that extra bit of pump is what you’re going for. Just know that if you push the limiter too far, you’ll end up with an inaudible mash of noise.
So Why Does Compressing Or Limiting Make A Sound Seem Louder?
As you know, compressing – or limiting – turns down the loudest parts of an audio signal. This effectively leads to a smaller dynamic range, the difference in volume within the audio signal. So let’s say the dynamic range of your sound is 5 dB – 20 dB and the applied compression results in 2 dB gain reduction. You’ll end up with a dynamic range of 5 dB – 18 dB after compression.
But… that’s not louder. You’re right, it isn’t. The peak volume started out at 20 dB and has now been decreased to 18 dB. So, how do we go from an audio signal that’s even lower in volume to one that seems louder than before? This is where the Make-up Gain (or Output Level) setting comes in.
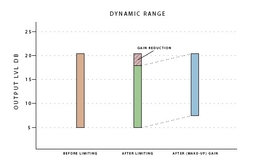
With the Make-up Gain setting, you can make up for the loss of volume after compression. It simply adds volume to the entire sound. This is important to remember. It doesn’t just boost the peak volume, it boosts everything. So after compression took 2 dB off of the peak volume (20-2=18), you can now add 2 dB via the Make-up Gain setting to bring the peak volume back to its original level (18+2=20). But here’s what’s different.
While compression or limiting left the quietest parts of the audio signal untouched, the Make-up Gain did not. This means that the bottom end of the dynamic range – 5 dB in our example – remained at 5 dB after compression, but then got a 2 dB boost from the Make-up Gain (5+2=7). Where the dynamic range was 5 dB – 20 dB before, it is now smaller: 7 dB – 20 dB.
Essentially, this means that while the peak volume has remained the same, the quietest parts have become louder. So even though the sound itself hasn’t technically increased in volume, the average volume did. And our ears perceive this as the sound being louder.
You now know what Limiting is, what it does and how it differs from Compression. If you wish to learn more about Limiting or music production in general, you may want to check out our music production masterclasses at Armada University.
You’ll learn the tools of the trade directly from your favorite artists in your preferred genre and/or DAW, and many of these masterclasses come with guaranteed feedback from Armada Music’s A&R team on a demo of your choosing.