
How To Use Compression - The Basics
How To Use Compression - The Basics
Have you ever wondered why your buddy’s kick drum has more ‘oomph’ than yours? Are you struggling to make sounds punch through your mix without resorting to drastic volume increases? What you need is compression, and we’ll be exploring what it is, what it does, what its various settings mean and how to properly use it throughout this article: ‘How To Use Compression – The Basics’.
What Is Compression?
Compression is a music production tool used to control the dynamic range of a sound: to decrease the difference in volume between its loudest and softest parts. This can be done by making the loudest parts quieter (downward compression) or the quietest sounds louder (upward compression).
Depending on the settings, compression can also be used to alter the character of a sound or to create a sense of cohesion between groups of sounds. It can be applied to a single sound (i.e. a kick drum), a group of sounds (i.e. various vocals or percussion elements) or even the entire track (mastering).
How Does Compression Work?
Let’s use vocals as an example here. Have you ever tried to balance an extremely dynamic vocal in your mix through volume adjustments only? Chances are it didn’t work out too well. Whenever the loudest parts of the vocal were at the right volume, the quieter parts were inaudible. And whenever the softest parts were at the right level, the others were too loud. It’s a fairly common problem, to which compression can be the answer.
By compressing a sound, you’re practically decreasing the loudest parts. Now, we hear you thinking that this only causes the sound to become quieter. This is true, but there’s one step that still needs to be completed.
If you were to turn up the volume of the entire sound afterwards until its peaks are as loud as before, it’s the quieter parts that have become more noticeable. The dynamic range has been decreased and the average volume is higher, even though the peak volume is still the same. Now, the sound is much more audible and pierces the mix a whole lot better.

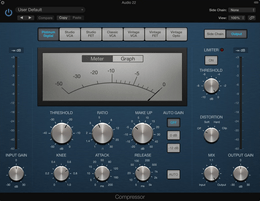
The Settings Of A Compressor
Controlling the dynamic range is the main purpose of a compressor, but that isn't its only use. Compression can also be used as an effect, to add punch or character to a sound or blend (groups of) sounds together. It all depends on the settings, so the next step is to explain what every setting or parameter of a compressor does.
Threshold
Threshold is a vital setting in all hardware and software (plug-in) compressors. It determines the volume level above which compression is applied, and is usually expressed as +/- (plus/minus) dB. This means that if you were to set your threshold at -20 dB, compression will be applied to all parts of the sound that exceed that level.
There is no ‘perfect’ threshold setting. It all depends on the sound input and what you are using compression for. But in general, a low threshold means you’re compressing a larger chunk of a sound. Also note that this is one of the reasons why you should be careful with raising the volume within a plug-in or synth AFTER compression has been applied. Changing the input volume will also change to what degree compression is applied.

Ratio
The ratio determines how ‘hard’ you’re squashing the parts of a sound that exceed the threshold level. For example: if you’ve set a ratio of 8:1 and the signal is 8 dB over the threshold, the final output will be only 1 dB over the threshold. In case you’re wondering, that’s a whole lot of compression.
Alternatively, if you set a ratio of 1.2:1 and the signal is 1.2 dB over threshold level, you will also be left with an output of 1 dB over threshold level. But this time, the effect of the compressor is much more subtle.
Gain Reduction
Although not all compressors have implemented this feature, we’re still going to discuss this one. Gain Reduction isn’t an actual knob or setting, but is simply a unit of measurement that allows you to easily check how much compression you’re actually applying. Let us take the above examples.
In the first case, where the input was 8 dB over threshold level and the ratio was set at 8:1. You’re left with an output that exceeds the threshold level by 1 dB. That’s a gain reduction of 7 dB. If you only wanted to apply some subtle compression, you’ve now discovered that you have some adjusting to do.
Attack
The attack setting is measured in time (ms) and controls how quickly the compressor reacts once the threshold level has been exceeded. A very fast attack time is great at removing unwanted volume peaks, but is also very noticeable. A longer attack time might not be fast enough for those sudden peaks, but does compress the parts of the sound that follow. This is useful if you want the punch or transient of a sound (this information is stored at the beginning of the sound wave) to remain untouched while still applying compression to the rest of the sound.
Release
The release setting is also measured in time (ms) and controls how long the compressor keeps affecting the sound once the signal has fallen below the threshold. A fast release time might give you that pumping sound, but can also sound very unnatural. A longer release time, on the other hand, might sound smoother, but can also negate the effects of a (fast) attack time if it persists for too long. It may also affect the transients of your sound, simply because it doesn’t have the time to turn off in between sounds.For more information on which settings to use for mastering purposes or for specific (groups of) sounds such as drums and vocals, we highly recommend reading our piece of Parallel Compression.
Compression Mistakes To Look Out For
Of course, compression isn’t a magic fix-everything tool. Using it incorrectly can cause various problems, which is why it's important to understand what you're doing. For example:
Heavy compression can be helpful if you’re aiming for an aggressive sound. But reducing the dynamic range so drastically means you might break your transients and kill some of the sound’s higher frequencies. You’re at risk of ending up with a flat and dull sound that, in general, is not particularly useful. Instead, apply compression in moderation and keep track of the changes to make sure you’re not overdoing it.
But once you’re mastered the basics and know what to look out for, there are no rules to using compression. Going out of the box can lead to some very interesting results. You just have to know what you’re getting yourself into, and we hope we’ve helped you get a sense of all that.
You now know what compression is, what it does and how to use it. If you wish to learn more about compression or music production in general, you may want to check out our music production masterclasses at Armada University.
You’ll learn the tools of the trade directly from your favorite artists in your preferred genre and/or DAW, and many of these masterclasses come with guaranteed feedback from Armada Music’s A&R team on a demo of your choosing. Or if you're confident enough, just enter our (remix) contests to potentially win an official release on Armada Music.