Parallel Compression: Explanation, Use and Tips
Parallel Compression: Explanation, Use and Tips
Parallel compression, sometimes called New York compression, is a popular mixing technique among music producers. But as with most music production tools, it can be rather difficult to get the hang of without the right guidance or a helping hand. Understanding how parallel compression works can be vital to making better mixes, so let’s jump into it right away and explore what it does, when to use it and how it can help you improve your music.
What Is Parallel Compression?
Parallel compression is a special audio processing technique that gives the producer more control over the output compared to regular compression. How? By blending (and balancing) a clean signal with a heavily compressed signal.
What Is The Difference Between Parallel Compression And Normal Compression
So other than the two being different techniques, what sets them apart? Excellent question! But before we get to the differences between normal compression and parallel compression, it’s important to understand what compression actually does. This is a great time to refer to our piece on the basics of compression, but we’ll give you the rundown here as well:
Compression reduces the dynamic range of a sound: to make the loudest parts of a sound quieter (downward compression) or the quiet parts louder (upward compression). In both cases, it means decreasing the difference in volume between the loudest and softest parts of a sound.
In the case of downward compression: if you then boost the peak volume of the processed sound back to the level of the pre-processed signal, you get a sound that has less dynamic range but the same peak volume. The human ear perceives this as an overall louder sound, which also happens to punch through your mix better. Depending on the settings of the compressor, you can use compression to:
- Control the dynamic range of a sound.
- Add more color and character to a sound.
- Glue a group of sounds together.
Sounds great, right? Well, yes it does! But the problem is the lack of control and the negative effects “regular” compression can have on a sound when it’s not applied in moderation. When it comes to downward compression, too much (or too aggressive) compression can badly alter the transients and punch of the sound. It can even chafe off some of the higher frequencies of the sound, essentially muffling it. And with upward compression, you’re leaving the transients intact, but you’re also raising the unwanted noise of a sound to audible levels. And that’s not what you want either.
So is there a best-of-both-worlds solution that gives a sound more power, attitude and (perceived) loudness without the aforementioned drawbacks? Yes there is. It’s called parallel compression.

How To Use And Set Up Parallel Compression
The best thing about parallel compression is that you’re getting the benefits of both downward and upward compression without the negative effects. Here’s how it works:
- Create a dedicated auxiliary (aux) channel – sometimes called a return channel – for the sound you want to compress. By routing the sound to that channel, you’re essentially creating a duplicate input signal you can apply effects to, all the while leaving the original sound untouched. Make sure the aux channel is pre-fader. Otherwise, you’ll need to readjust the compressor settings every time you change the volume of the original signal.
- Decide what you want to achieve with compression:
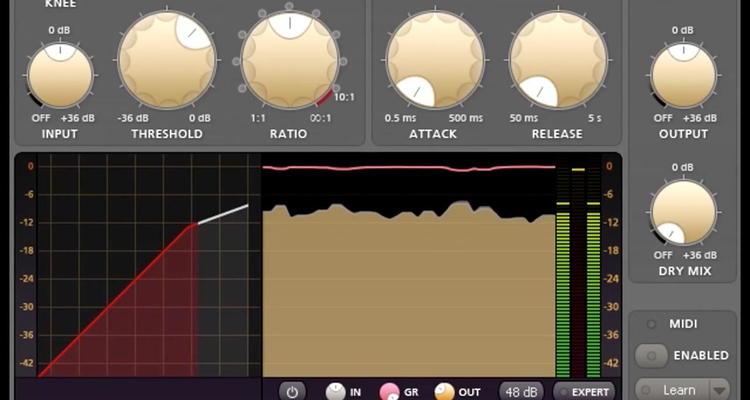
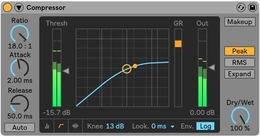
- To control the dynamic range, make the sound more consistent and help it pierce the mix better, your overall best bet would be to use a fast attack, fast release, hard knee and a relatively high ratio.
- If you want to give your sound more color and character, it’s generally best to stick with a slow attack, slow release, soft knee and low ratio. Using analog compressors can also help shape the sound, as those often add a bit of saturation or gentle distortion as well.
- If you want to glue groups of sounds together to make them sound more coherent and in tune with one another, we generally advise using medium settings (attack, release, knee) with a relatively low ratio.
- Place your compressor of choice on the aux channel and apply some aggressive (heavy) compression. This means overriding the above advise of the ratio settings, because heavy compression equates to a low threshold and high ratio.
- Use the fader of the aux channel up to blend the compressed signal with the original sound. If the fader of the aux channel is pushed higher, more of the compressed signal blends with the original (uncompressed) sound. Adjust at will until you’re happy with the sound and balance.
That’s the manual, most applicable method of setting up parallel compression. It can also be done in every DAW, such as Ableton and FL Studio. They may have their own methods and workflow when it comes to routing, but the premise is all the same.
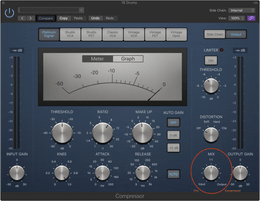
Nowadays, lots of compressors also come with a dry/wet (or mix) knob, which can be used to achieve the same effect without the need to use aux channels and/or routing. The only downside to that is that you won’t be able to use other effects, such as EQ, on the duplicate signal.
Why and when do you use Parallel Compression?
Now that we’ve covered the basic compression knowledge and how to set up parallel compression, the obvious follow-up question would be about the why and when of using this technique. The why is actually straightforward. You use parallel compression when regular compression doesn’t give you the result you want. This could be because of the drawbacks of normal compression (broken transients, loss of high-end frequencies, too much unwanted noise) or simply because you just want to have more control over the dynamic range.
So that leaves one question left unanswered: when do you use parallel compression? And that leaves a window open to give you the answer that’s deeply embedded in music production culture: that depends.
First, you’ve got to think about why you’re using (parallel) compression to begin with. Is it to control the dynamic range? Is it to give a sound more color and character? Or is it simply to make groups of sounds connect a bit better. That will not only give you a good idea of which sounds to use parallel compression on (and thus answers the “when/in what situation?” question), but will also tell you what ballpark you should be looking at in terms of settings. Overall speaking through, (parallel) compression is most often used on drums (percussion), vocals and in the mastering chain, so we’ll be focusing on those next.
Parallel Compression On Drums – Settings
Parallel compression is a very popular technique to use on drums, as producers often want their drums to be powerful and consistently present throughout the mix. And that makes sense, because strong beats are the backbone of most forms of dance music. Also, drum sounds in particular can have extremely sharp volume peaks that need to be tamed in order to raise a track’s overall volume and compete in the loudness war.
(Parallel) compression will allow you to control the dynamic range of one, multiple or grouped percussion sounds so that their impact is consistent across the track’s entirety. And because the punch and transients of drum sounds are also important, parallel compression is a great option due to its enhanced control.
Since we’re doing parallel compression and not normal (downward) compression, you’re already working with a low threshold and high ratio to ensure you have one heavily compressed input signal to work with.
The attack setting determines how long it will take the compressor to act once it’s received a trigger. You don’t want to alter the initial punch of the drum sound, so we advise starting with a slow (or long) attack (around 30 ms) and to adjust slightly until you’d found the right spot.
The release setting determines how long the compressor will keep working after the trigger signal ends. And since you don’t want to alter the punch of your drums sounds, you’ll want the release to be fast (or short) enough so that it stops working right before it gets trigged by the next drum sound.
Parallel Compression On Vocals - Settings
Vocal recordings often have a large dynamic range: a significant different in volume between the loudest parts and softest whispers. So while parallel compression won’t generally be used to give vocals more character or to glue multiple vocal sounds together, it’s perfect for bringing out a vocal’s low-level detail. That way, you can bring up a vocal’s natural drops in volume (at the end of a phrase or when shifting to a lower register) and bring the vocal to life.
In terms of settings, we generally advise a medium attack time (about 4-6 ms) and a (very) fast release.
Parallel Compression For Mastering – Settings
Another popular application of parallel compression is in the mastering chain. When it comes to compressing the master track (or stereo output), you’ll want to be clear on the intended goal before you start tweaking.
If you want to add punch and dynamics, you’ll have to focus on keeping the transients (largely) intact. So this mostly follows the same settings as those for parallel compression on drums: an attack of 10-30 ms for sharper/snappier transients or 30-100ms for more punch on the heavier sounds, like kick drums. The release setting could be somewhere around 100 ms. Slide it around a bit and see what works best. Use those ears!
If you want the opposite – more density in the body of the track – you’ll want to work with shorter attack and release times compared to the previous settings. Overall, you might not want to go under 10 ms (attack) and 50 ms (release) though. Is the sound becoming distorted while the transients still require more compression? Ease up on the ratio a little.
Can parallel compression cause phase issues?
The answer is no. Parallel compression should not cause phase issues. But it all depends on one particular setting of your DAW: ‘(automatic) delay compensation’.
Every effect plugin you place on a channel comes with a bit of added delay or latency. And because of that delay, the clean (original) signal would start playing a fraction of a second before the overly compressed duplicate signal you created for parallel compression.
Thankfully, most DAWs have delay compensation enabled by default. But if you’re parallel compressing and hear a terrible sound (comb filtering) upon first playback, you might want to double-check just to be sure.