How To Tune Your Kick Drum For A Better Mix
How To Tune Your Kick Drum For A Better Mix
Getting a clean mix can be difficult if your kick and bass aren't working together. Both sounds are fundamentals of dance music, so you need to give both enough space in the mix. And this technique, which is one of the five listed in our article about how to mix kick and bass for a clean low end, will help you do just that. Read on for a detailed explanation on how to tune your kick drum for a better mix.
Why Is Tuning Your Kick Drum Even A Thing?
Life is good in music production land. You’re over the moon with your latest production and you're about to send it to your favorite label for consideration. But just when you're about to press "Submit", a producer buddy kicks down the door and pushes you out of your chair. You hit the ground hard and are about to fire back with a flurry of choice words until you look up and see the expression on his face. “Dude”, he says. “You forgot to tune your kick drum.” Pfew, disaster avoided.
We realize this may come as a shock to some producers, but a kick drum has a key. We’ll leave the sound synthesis explanation for another time, but the gist is that the foundational element of the kick drum is actually a fast-dropping sine wave that ends at a low-register note. That note is so low it’s almost impossible to hear the tone, but that changes when you pitch the kick drum up a few octaves. Try it.
Finding The Key Of Your Kick Drum Sample
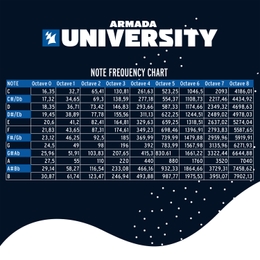
For an optimal kick-bass balance, you can make the note of your kick drum match the key of the entire song. First, you must identify the note of the current kick drum sample. Our advice would be to load the sample into a spectrum analyzer that displays frequencies as musical tones, such as the free plugin Voxengo Span. Alternatively, you could use the built-in spectrum analyzer of DAW native plugins, such as Ableton Live’s EQ Eight. Now find the tallest peak on the spectrum display and hover over it with your mouse. That should tell you the key of the sample. If your spectrum analyzer doesn’t convert frequencies to musical notes, you can do this yourself via the below chart.
The Music Theory Behind Tuning Kick Drums
Assuming you already know the key of your song, let's move on to step two: pitching the note of the kick drum.
You generally want to pitch the kick drum to the closest – here comes a music theory term – perfect interval. The perfect intervals are all fourths (5 semitones up or 7 semitones down), fifths (7 semitones up or 5 semitones down) and octaves (12 semitones up or down) relative to the root note. For the purpose of explaining, we’re hereby determining that the key of your track is C. That would mean F is a fourth, G is a fifth and C is an octave.So let's say you identified the note of your kick drum as E. Then your best bet would be to tune the sample to F (a fourth), as that’s the closest perfect interval. This would require you to transpose your kick drum up two semitones. And if the key of your kick drum were to be C#, the closest perfect interval would be C, requiring you to pitch your drum sample down by one semitone.
Don't like how the kick drum sounds when pitched to the closest perfect interval? Feel free to try other perfect intervals to see if that generates a better sound.
How To Tune The Kick Drum With Pitch-Shifting Tools
Ready to transpose the kick drum sample? You have two options.
The first is the easiest. Use a pitch-shifting tool on the sample to transpose it by the number of semitones you’ve calculated. Every DAW should have its own native pitch-shifting plugin, which will get the job done fairly easily. But do take heed of this word of caution: using a pitch-shifter to tune the kick drum could badly alter the attack of your kick drum. That counts for any percussion sample you might want to tune.
How To Manually Tune A Kick Drum
The second option is the safest, but will require more effort on your part. This involves manually speeding up (or slowing down) the sample until it achieves the proper pitch. Most DAWs have their own sample/audio editing tools, but you could also make this work with dedicated hardware or a software sampler.
- First, cut the sample in two, right between the punch/attack of the kick drum and the tail end (the low frequencies). This requires a bit of attentive listening on your part. Does it sound like your kick drum has gone through a 200-250 Hz low-cut filter? Then you’re on the right track. Find the cut that sounds best to you, as it may differ per kick drum sample.
- Once you’ve cut off the tail part of the sample, you can speed it up or slow it down separately in the audio sampler of your choosing. There will likely be some trial and error involved here, so keep analyzing the frequency and tone of the kick drum along the way so you know when you’ve hit the right tone.
- Glue the two sample pieces back together. It should be pretty straightforward, but you may occasionally hear a tick sound. In that case, smoothen the transition by gently crossfading the volume of both parts until you can no longer here the tick or click.
This second method will require more effort, but the sound you end up with should be cleaner compared to the output of the first method.
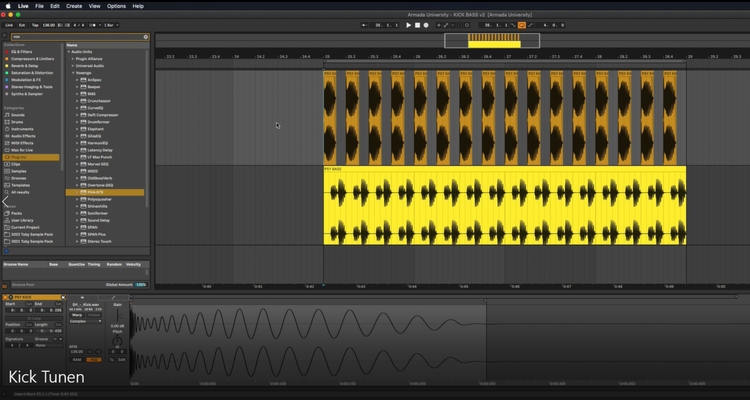
[Check if your sound is on. Audio starts at 0.10]
This video puts both ways of tuning your kick drum into practice. In this particular case, the bass plays an F. It's difficult to hear the tone of the kick drum in its original playback form, but you'll notice once it's pitched up about two octaves. In Ableton, you can achieve this by activating warp mode and using the pitch functionality (just below the gain slider). At +25 (or +13) semitones, you can hear the kick drum aligning with the tone of the bass. And since 25 semitones equals two octaves and one semitone, that means the original kick drum is in E and only needs to be pitched one semitone up in order to move from E to F.
You can hear the significant tonal improvement, but also that the pitch-shifting tool negatively impacts the attack of the kick drum. It has become a bit weaker, and you'd rather keep the punch as is. That's why the video moves on to cutting the waveform into two parts: the attack and the rest.
Make sure cut it at just the right place, as cutting the waveform too soon could also affect the attack of the kick drum. Make sure to connect the two halves with an even crossfade and consolidate it to turn it back into a single audio sample.
In the final part of the video (2:40 - end), you'll hear the difference between the first eight kicks (tuned) and the final eight kicks (untuned). With the first eight, the kick-bass mix is a lot tighter and there's more room in the low end.
What If I Don't Want To Tune My Kick Drum At All?
If you can't be bothered with any of the above, you could decide to choose a different kick drum sample: one that already fits the key of your song. But if you don’t like the other samples at your disposal, you can always visit this page again for a great kick-tuning solution. After all, your producer buddy may not be around to save your life next time.
Read the entire article? You're now able to tune your kick drum for a better kick-bass balance. Can’t get enough of these tips, techniques and explanations? Browse our music production articles or learn directly from your favorite artists through our music production masterclasses.