How To Mix Your Kick & Bass: 5 Must-Know Methods
How To Mix Your Kick & Bass: 5 Must-Know Methods
Can't get your kick and bass to sound right together? You're not alone; getting the kick-bass balance right is notoriously hard. So we've set out to teach you five production techniques that will help you mix the kick and bass.
Mono And Mid/Side Mixing
Mono seems to have become a bad word in the producer community. Less seasoned producers often disregard mono because they feel too strongly about the width and spaciousness of stereo. Don't get us wrong; stereo sounds nice. But mono also has its place in a proper mix.
The "problem" with stereo is that its output is difficult to control and consequently too unreliable for the low end of a track. The frequencies between 50 Hz and 120 Hz make up the bulk of the low end, and those frequencies need to be at the center of your production rather than spread to the sides. So our advice is: make sure your kick drum and bass are mono below 120 Hz if you don’t want your production to lack low-end power.
While we advise to keep your kick drum completely mono, there’s a bit more leeway for the bass. You can still push the mid-high frequencies of your bass to the side for a wide stereo image, as long as you don’t forget to push the frequencies below 120 Hz to mono. You can achieve this by following the below steps:
- Select an EQ that allows for separate mono/stereo mixing.
Examples are Ableton Live’s EQ Eight, Logic Pro’s Channel EQ/Linear Phase EQ (since the Logic Pro 10.1 update) or FabFilter’s Pro-Q 3 plugin. - Use the Mid-Side (or M/S) function of the EQ by switching to the Stereo (S) signal and applying a steep low-cut filter at 120 Hz.
- That's all. You just pushed the frequencies below 120Hz to mono without altering the rest of the sound and frequencies of the stereo signal.
Another way to improve the synergy between the kick and bass is to use mono and side EQ. A kick drum sample should always be in mono, but if you want to be extra sure, you can just place a mono plugin on the kick drum.
Due to being stereo, a bass sound can have a lot of low frequencies on the side. This could cause a sloppy low-end mix, and here’s how you fix it:
Place an EQ with mid-side functionality on the bass. Now select the side EQ option and cut all frequencies below 120 Hz. Now all frequencies below 120 Hz are solely mono, and that will have tightened up your low-end mix significantly.
Cutting & Crossfading The Waveforms
An easy way to make your kick and bass play nice with each other is to work toward that goal on an audiovisual level. By zooming in on the waveforms, you can see where the kick and bass overlap. Then it’s a matter of cutting and (cross)fading to make room for one another.
As you can see in this video, the low end gets more space and becomes tighter. Two things to keep in mind:
- It can be beneficial to have a bit of overlap. If the kick pushes slightly against the bass, it can add extra drive.
- Cutting too much off of the kick drum means you'll lose the low-sub tail. of the sample.
Be sure to listen to what you’re doing instead of just relying on what the waveforms visually tell you.
Sidechain And Volume Control
Another way to give the kick drum and bass enough room in the mix is through sidechain or (automated) volume control. Both sounds occupy a lot of low-end space in your mix and often share a frequency range, which means that your low end might get muddy when they’re playing together. If you’d rather not look for different samples that complement each other, you can solve this by controlling your volume levels through sidechaining.
There are various basic plugins that can help you automate/control the volume of your bass sound to avoid low-end clashes with the kick drum. Some examples are the LFO tool, the volume shaper and Nicky Romero’s Kickstart plugin. You can select a pattern preset within these plugins – chances are you’ll select dance music’s signature 4/4 pattern – to automatically sidechain the bass whenever the kick drum plays.
For other rhythm patterns or as an alternative method, you can use a compressor that has a sidechain function, such as the native compressors of Ableton Live and Logic Pro:
- Place the compressor on the sound you’d like to sidechain. In this case, that's the bass.
- Select the kick drum as the input signal. This will ensure that the kick drum acts as a trigger to ducking the volume of the bass.
- Make sure that the threshold of the compressor is lower than the input signal: the kick drum. The bass will be sidechained more heavily (i.e. loses more volume) on a lower threshold setting.
- Choose the attack and release times of the compressor. We advise a hard attack setting for its ability to remedy a low-end clash when the bass and kick overlap. Adjust the release time so that the bass is audible again once the sound of the kick drum dies down.
Experienced producers (or the control freaks among us) can also use manual automation clips to control the volume of the bass when it overlaps with the kick drum.
We’ve got a psy-kick and a psy-bass here. And together, they sound quite messy. This is because both sounds carry lots of low-end frequencies and are occupying the same space. On top of that, there also isn’t a lot of movement. Sidechain will help resolve both.
00:00 – 01:30
Sidechain is basically an automated change in volume, and we’re using Nicky Romero’s Kickstart plugin to show you what it can do (Xfer’s LFO tool and Cable Guys’ Volume Shaper are great alternatives). The plugin shows a dip at the start of every count. In this case, that means the volume of the bass is lowered when the kick drum hits.
01:30 – 02:25
There are various settings to the Kickstart plugin, as well as a way to adjust the sensitivity. But if you really want to control how much you’re lowering the volume, you can do the same by manually setting the volume automation.
Tuning The Kick Drum
Tuning the kick drum to the key of your song can make it easier to mix the kick and bass in the long run. When the note of the kick drum matches the track's harmonics, the tonal fundamentals are aligned. This can help avoid muddiness when the tail of the kick drum overlaps the bass sound.
Not every situation demands a tuned kick drum, but it’s a very helpful technique nonetheless. And there are generally two options to tune your kick drum if you chose to work with an out-of-tune kick drum sample:
- Using a pitch-shifting tool. This is the easiest method, but may sometimes badly alter the attack or general sound of your kick drum.
- The manual method. Manually tuning your kick drum means cutting the sample in two, effectively separating the punch and the low-end of the kick drum. You leave the first half of the sample (i.e. the punch) untouched and slow down or speed up the second part until it reaches the right pitch. Then glue the two parts back together and smoothen the transition with some crossfade if needed.
For a more detailed explanation on tuning a kick drum, we recommend reading our dedicated article: ‘Tuning Your Kick Drum For A Better Mix’.
Aligning The Phase
Adjusting the phase of the bass to match the kick drum is a more advanced music production technique that could yield amazing results. The trick is to shift the waveform of the bass slightly so that it melts together with the kick drum.
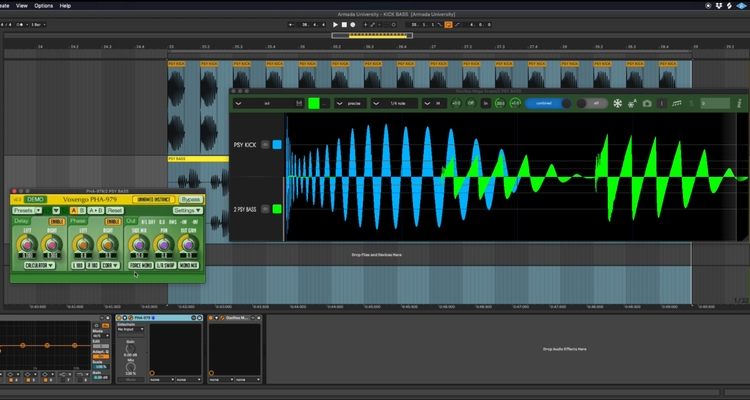
- Analyze the kick and bass with a suitable plugin, such as the Oszillos Mega Scope. You will see the exact wave forms of the kick drum and bass running through one another.
- Keep the Oszillos Mega Scope running and place a phase plugin (such as Voxengo’s PHA) on your bass sound.
- Force the sound to mono.
- Turn the phase knob. Within the Oszillos Mega Scope, you can see that the position of the wave form of the bass changes. Keep going until the wave form of the bass lines up with the wave form of the kick drum. That way, the sounds won’t cancel each other out but will blend together nicely instead.
Another (advanced) technique you can use to get the kick and bass right is to align their phase. For this, we’re using the Mega Scope plugin and the PHA-979 by Voxengo. The first is an analyzer, the second can help you shift the time/phase of a sample. Bear with us, because it took a bit of time to find the PHA plugin (haha).
0:30 – 01:30
First off, we’re placing the Mega Scope onto both channels and selecting the “combined” option. We’re also selection “1/4 note” for a good zoom view. The wave form of the kick is blue, en the wave form of the bass is green. As you can see, the sound waves of the bass aren’t align with those of the kick drum, which means there’s room for improvement.
01:30 – 3:20
This is where the PHA plugin comes in. We’re placing it before the Mega Scope in the effect chain so we can monitor all changes. First off, we’re pushing the plugin into mono by selection the “force mono” option. We now have two choice for aligning the kick and bass: turning the phase knob and turning the delay button. In this particular case, we found the delay knob to be our best option, mainly because the phase of the bass is already quite nice. Although it would make the low end a bit tighter, adjusting the phase would also badly affect the higher frequencies and attack of the bass. So we’re sticking to the less rigorous option: the delay knob. When moving the wave form slightly to the right, you can hear the sub tightening up. It makes a huge difference compared to the starting point and makes the entire mix and the low end a whole lot tighter.
3:20 – end
We’ll let you hear the difference once more.
With these tips for mixing your kick drum and bass, you’re bound to get the clean and booming low end you so desire. Can’t get enough of these tips, tricks and explanations? Browse our music production articles or learn directly from one of your favorite artists through our music production masterclasses.